|
|
|
You will use a new file type, format, to create a template:
file>new...(pick format)
The new format dialogue will appear (Figure 1).
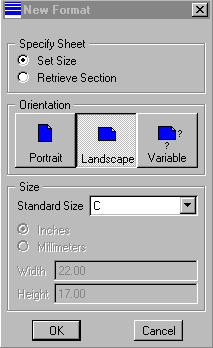
Figure 1.
Under Standard Size choose A.
Name the format title-a.
Click OK.
Zoom out , if necessary, so that you can clearly see the predrawn rectangle.
It looks as though your titleblock border has already been drawn for you, but what you see is an outline of an A-sized sheet of paper (8.5 x 11 inches). Since laser printers do not print all the way to the edge of the paper, you will want to draw a border .5 inches in from each edge. 2D drawing tools are available in the detail menu. You can use an offset tool to offset-copy the existing lines towards the middle:
detail>tools>offset>ent chain
Select all four lines and then done sel. An arrow appears indicating the positive direction for offseting (you may need to zoom out to see this).
Enter either -0.5 or 0.5, depending on the direction of the arrow, to copy-offset the lines. You should now see a new rectangle inside the original rectangle. This is your titleblock border.
Click done/return at the bottom of the tools menu.
The grid cells containing the titleblock information is created in the table menu. You need to specify the direction in which you create the cells of the table, how the size of the cells will be specified, and to what entity you will anchor your table to. Choose:
format>table>create | ascending | rightward | by length | vertex
Click on the lower left corner of the inner rectangle (your border).
Enter, first, the column widths of the cells (in inches):
1, 3, 2.5, 1, 1.2, 1.3
Hit enter between each number and then one more enter to end entering widths. Notice how tick marks are placed going left to right along the horizontal border showing the cell spacing.
Now it prompts you for the row height. There is only one: .25 and enter. Hit enter one more time to finish. Figure 1a will show you what the table cells (and the text in them) should look like.
Now you want to set the justification for text within the table cells. The left two cells should center the text vertically and horizontally:
table>mod row/cols>justify | column | center | middle
Select in the center of the left two cells and then done/return.
Repeat the process with the remaining cells, except they should be justified left and middle:
table>mod row/cols>justify | column | left | middle
Now you can enter text into the cells based on Figure 1a:
table>enter text
Select the cell, then Type in the text, hit enter, and then another enter to finish. Repeat for each cell.
Though the text in the two left cells is probably of appropriate height, the remaining text is too tall. Change the text height by:
detail>modify>text>text height
Select the cells with NAME:, SCALE:, DATE:, and SHEET OF then done sel. Now enter a new height of 0.1
Save your format. You can now use this template for drawings, placing views and modifying the titleblock text as appropriate.
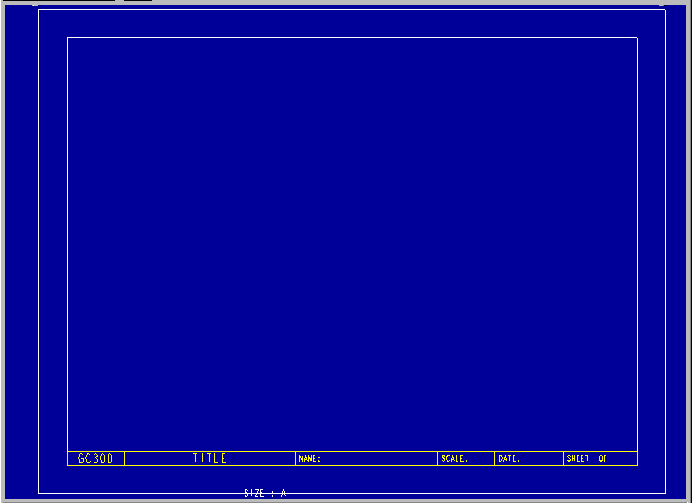
Figure 1a.
file>new...(choose drawing)
Name the drawing file file fixture and click OK.
Often, it is best to name it the same as the part you are laying out. It will have a different extension (.drw rather than .prt) than the part file.
Now, you are given the option of specifying a drawing size or choosing an already created format file. Do the later by retrieving the titleblock you have just created.
Under specify sheet, choose Retrieve format.
Click on the pull-down menu next to Name: and choose the name of the template: title-a.
Clike OK.
Now you want to incorporate the part with the titleblock. The views menu is the primary menu for creating views of a part.
In the main drawing menu, choose views. With the first view, it will prompt you for a model name. Enter fixture.prt, the part you created in Tutorial 2.
The first view that we will layout will be a 'master view' which you will orient to be the front view.
views>add view | general | full view | No Xsec | scale | done
Click on the spot in the lower left quadrant of the titleblock where you would like to place the center of the front view. You will then be prompted for the scale. Enter 0.333. Your view will now be in the default orientation (see Figure 2).
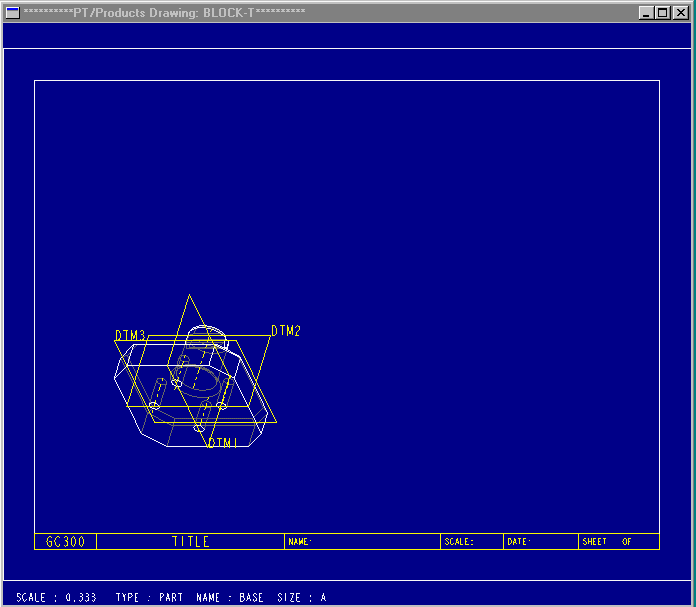
Figure 2.
You now want to orient the view to be a front orthographic view.
From the Orientation dialogue, select Front from Reference1 Then click on DTM2. Now select Bottom from Reference2 and click on the bottom face of the fixture. Your view should now be reoriented to look like Figure 3. If it is, then click OK.

Figure 3
This will serve as the front view of a multiview drawing.
Once the front view is placed, the top and right side views will orient relative to this view.
To place a top view:
views>add view>projection | full view | No Xsec | No Scale | done
You will be prompted for a center point. Click above the front view, so as to indicate the top view.
For the right side view, we will make a full cross-sectional view.
views>add view>projection | full view | section | No Scale | done
The next menu gives you a number of options for your cross section. You will want the cutting plane to go completely through the object and you will want to see the complete sectional view. From the XsecType menu:
Full | total Xsec | done
Click on the right side of the front view.
Now you need to define the cut of the cross-section, in the Xsec enter menu, enter:.
create>planar | single | done
Every cross section you define is stored for future use, so you must name them. Enter A.
You will now be prompted for a planar surface or datum plane to define the cutting plane. Select DTM1 in any view.
You will now be prompted for a view where the section line will be seen. Click on the front view.
The right side view is now changed to a full section and a cutting plane line is added to the front view. To complete the drawing, you will add a pictorial view of the part in the upper right corner of the drawing. Since this is not an orthographic projection derived from the front view, you will need to create a new general view:
views>add view>general | full view | No Xsec | Scale | done
You will be prompted to pick a center point for the location of the final view, click in the upper right hand corner of the drawing.
You will be prompted for a scale. Enter 0.25.
To rotate the object so the shaft can be seen, pick Angles under Type and Horizontal under Reference. Enter in an angle of 85 and click OK. With all of your views in place, your drawing should look like Figure 4.
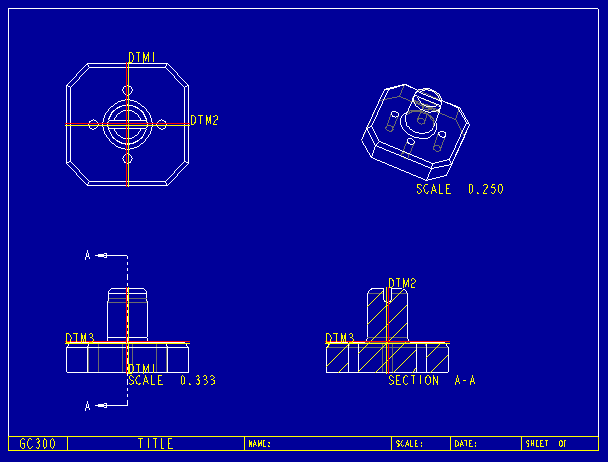
Figure 4.
view>move view
You can now move the views around to have appropriate spacing between the views. The front view is the parent view of the orthographic views. If you move that view, all of the corresponding 2D views will move along with it. However, you will be able to individually move the right and top views, horizontally and vertically, respectively.
With the views located, now it is time to properly represent the line work in each of the views. For none of the views will you want to see the datum planes. Turn these off with the datum display icons
Next, customize the linework in each of the views. For the top and front views, you will want to see hidden lines as dashes and no tangent lines.
views>Disp Mode>View Disp (select the top and front views) | done sel>Hidden Line | No Qlt HLR | No Disp Tan | Hide skeleton | done
The right side section view is similar except no hidden lines should be displayed.
Finally, the pictorial should show no hidden lines, but no tangent lines wipes out the display of most of shaft (try this). An alternative is to display the tangent lines as phantom lines (Tan Phantom option).
Your drawing should now look like Figure 5.
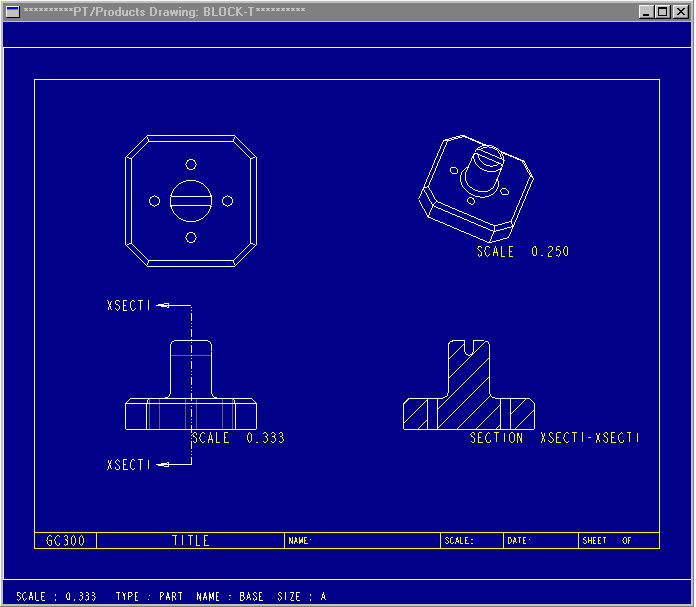
Figure 5.
detail>Show/Erase
This brings up the show/erase dialog:
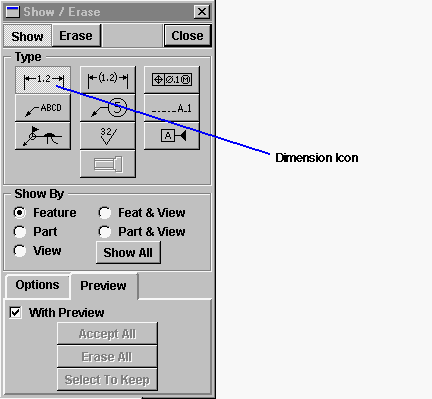
Figure 6.
The top buttons, show and erase, sets the mode of the dialog (you are going to be showing dimensions). The set of icons below the buttons allows you to select what kind of detail item you are going to work with: dimensions, notes, balloons, weld symbols, etc. Below this are options as to how you want to display:
Begin by previewing what will happen if you show all dimensions:
Choose Show at the top and the With Preview check box.
Click on the dimension icon (the top right icon) and Show All. (see Figure 6).
This will automatically place all the dimensions that were determined when the part was originally created. Since it is a pretty simple part, we can start cleaning up the drawing from here.
Choose Accept All from the Preview tab. and then Close from the bottom of the dialog box.
The following commands in the detail menu will help you clean up the dimensions. Remember, you want the dimensions to be in the profile view for a feature and multiple holes only need to be dimensioned once.
Individual axes can be turned on in the Show/Erase dialog by selecting the axis icon rather than the dimension icon.
Your final drawing might look something like Figure 7. Note that you cannot erase/delete the scale or xsect notes. Move them where they still reference the appropriate views but are not in the way.

Figure 7.
modify>text>Text Line
If you click on the NAME: text, you will see the following in red in the command window:
{0:NAME:}
Text in table cells is broken up into blocks, each enclosed in {} and labeled with a leading number and a colon. In this case, 0: indicates it is the first block of text. Since each block of text has its own properties (e.g., text height), you will want to add your name to this block so it will inheret its properties. Use arrow keys to move over the text line without erasing it or the backspace key to erase. Your text line should look like (make sure not to forget the final curly bracket):
{0:NAME: ERIC WIEBE}
Hit enter when you are done and then choose
another text block. If necessary, you can use modify>text>Text Height to
change height.